This is the initial Online Players Committee version of the Rulebook. It is a combination of the Starter Rulebooks and the Comprehensive Rules to provide an easier to read and learn experience.
Starter Rules
If your friends aren’t players yet, you can use this book to get started and soon be teaching them how to play.
The rules up to and including “Winning the Game” should be enough for you to play your first few games. The additional rules on later pages cover less frequent situations in the game, and will be easier to understand once you grasp the basics.
Refer to the Comprehensive Rules for more detailed rulings and explanations.
Determine which player will take the first turn either at random or using any method both players agree to.
Each player searches his or her deck for a location. Reveal your choices at the same time, and put them in the middle of the play area. If the beginnings of their titles are the same (the parts before the slash / symbol), place them adjacent to each other. Otherwise, place them separately.
Shuffle the rest of your deck, place it face down in your reserve, then draw the top eight cards to form your opening hand.
Turn Sequence
Each turn has six phases which occur in order.
When the first player completes all six phases of the turn, his or her opponent takes a turn, and so on back and forth until one of the players wins the game.
1. Activate Phase
In this phase, you may perform an activation action. You may do this only once during each of your activate phases.
Total the amount of energy generated for you by the energy icons on your side of all locations, then add 1 to that total. You may activate up to this much energy.
You and your opponent have each played one location. One has no energy icons on the side facing you, and the other has two. You may activate up to three energy (0+2+1). You may choose to activate less. Whatever amount you choose to activate, you take that number of cards one at a time from the top of your reserve and put them on top of your active pile without looking at them.
2. Control Phase
In this phase, you may perform drain actions. You may drain one time at each location you control that has at least one energy icon on the side facing your opponent. Each drain action targets only one location.
You control each location where you have at least one ship or unit and your opponent doesn't.
When your drain action resolves, your opponent loses 1 energy for each energy icon on the side of the location facing him or her.
You have three units at a site that has two energy icons on your opponent’s side. He has no units at that site. You drain at that site, so your opponent loses 2 energy. He does this in any combination from his reserve, active pile, and used pile. He can also lose cards from his hand. He decides to lose a card from his hand, and the top card of his reserve. You can’t drain again at the same location this turn.
3. Deploy Phase
In this phase during your turn, you may play cards from your hand. There’s no limit to the number of cards you may play.
Any time you play a card, you must pay the costs listed in its upper left corner. There are two types of costs, energy cost and support cost. If you can’t fully pay a card’s costs, you can’t play it.
You pay the energy cost with energy from your active pile. Take that number of cards one at a time from the top of your active pile and put them on top of your used pile without looking at them.
You pay the support cost with your support icons of the appropriate type on locations. Your support icons are on your locations, on your side (the side facing you).
You want to play a card that costs 5 energy and three [EARTHER] support icons. You take five cards from the top of your active pile, one at a time, and put them on top of your used pile without looking at them. You use three [EARTHER] support icons, from three different locations that each have one [EARTHER] support icon on your side.
Support icons are not “used up” in any way when you play a card.
If you play a card that has a support cost of three [QUAY], and you have only three [QUAY] support icons, you may still play other cards that require [QUAY] support icons on the same turn.
Unique
If a card has a diamond (♦) before its card title, it’s unique. When you have a unique card in play, you can’t play another copy of it. Your opponent may also have a copy in play of his or her own.
Any card that doesn’t have a ♦ before its card title is not unique. Each player may have any number of copies of those cards in play at the same time.
Playing a Location
Locations have no energy cost or support icon cost to be paid. Your locations and your opponent’s mix together in the play area. There are two types of locations, sectors and sites.
The locations you play always face you in the play area. Energy icons on the bottom of that location are yours (on your side). Other energy icons on the top edge of your location are your opponent’s (on his or her side).
Each location has a slash (/) in its title. If the part of a location’s title before the slash is the same as that part of another location’s title, those locations are related.
The locations Ganymede/Traginium Source, Ganymede/Core Shaft, and Ganymede/Mining Platform are all related. None of these locations is related to Earth/Humanity’s Home.
Each site must be played adjacent to a related site, if another such site is already in the play area. If multiple related sites have already been played, you may play the new site on either end of that group, or insert it in between any two of those sites. If there are no other sites related to the one you’re playing, separate it from other locations in the play area. The arrangement of sites impacts the strategy of the game, and once played, they can’t be changed.
Sectors are played on one end of the group of sites related to them, if such sites are already in the play area. If there are no locations related to the sector you’re playing, separate it from other locations in the play area. Sectors are grouped with sites for easier reference, and the order of multiple sectors related to a group of sites is unimportant.
Playing a Ship
When you pay the costs to play a ship, choose a target sector in play where that ship will enter play. It must have at least one energy icon on your side of it, unless you already have another ship at that sector.
Playing a Character, NōBot, or Vehicle
When you pay the costs to play a character, NōBot, or vehicle, choose one of two places where that character, NōBot, or vehicle will enter play.
You may play it at a target site in play. It must have at least one energy icon on your side of it, unless you already have another character, NōBot, or vehicle at that site.
You may play it at a target sector, aboard (stacked beneath) one of your target ships. Each ship lists a capacity, the maximum number of characters, NōBots, and/or vehicles that ship can carry.
Playing a Weapon
When you play a weapon, choose your target card in play to give that weapon to. The weapon is played beneath the card. The card type line of the weapon specifies in parentheses what sort of card it may be given to.
You may play a WEAPON (SHIP) beneath any of your ships. You must play a WEAPON (FIGHTER) beneath your ship card that says FIGHTER.
Each card may have only one weapon beneath it. Weapons can’t be transferred from card to card. You can’t voluntarily dismiss a weapon in order to play another.
Playing an Asset
Some assets play together in a separate part of the play area. Other assets are given to specific other cards. Like a weapon, the asset is played beneath the card.
The card type line of an asset will specify in parentheses what sort of card, if any, you must give the asset to. When you play such an asset, choose an appropriate target card to give it to.
Usually, you can only play an asset beneath one of your cards. Many assets have an ability that allows you to play them beneath one of your opponent’s cards.
Usually, a card may have any number of assets beneath it. Some assets have an ability that says you can only play one of that asset beneath a particular card.
Playing an Order
An order provides a one-time effect at the time you play it. There are two kinds of orders, ORDER (USED) and ORDER (LOST). After you perform the effects of a used order, put it on top of your used pile, where it again becomes part of your energy. After you perform the effects of a lost order, put it in your lost pile.
Playing an Interrupt
An interrupt provides a one-time effect at the time you play it. There are two kinds of interrupts, INTERRUPT (USED) and INTERRUPT (LOST). After you perform the effects of an interrupt, put it on top of your used pile or in your lost pile, as you would a used order or lost order.
Unlike an order, you may play an interrupt during any of the six phases of your turn or your opponent’s turn. Interrupts are the only cards you can play outside of your deploy phase.
Some interrupts have a bullet (•) symbol before their card titles, just like some activated abilities have before their costs. If an interrupt has this symbol, you can only play one copy of it each turn.
4. Battle Phase
In this phase, you may perform attack actions. You may attack one time at each location where both players have a unit and/or ship. Each attack costs you 1 energy, and begins a battle with your opponent – a sector battle or a site battle, depending on the type of location targeted by the attack.
During battle, units and ships can be damaged. When you damage a unit or ship, rotate it 90 degrees. While it’s damaged, it can’t be damaged again.
Each battle has five steps which occur in order. You must complete each of these steps, ending one battle, before you may perform another attack action.
Before each step of the battle, both players can play interrupts and/or use activated abilities. The player whose turn it is goes first. When both players consecutively pass on the opportunity to do so, the next step begins.
Battle Destiny Step
Each player determines his or her own battle destiny in the battle, to be used in the next two steps. First, you add the tactics of some of your cards in the battle. In a site battle, you add the tactics of all your units in the battle. In a sector battle, you add the tactics of all your ships in the battle (but not any units aboard them).
When this step begins, battle destiny can’t be modified by interrupts/activated abilities, although triggered abilities may still affect it.
In either case, if that total tactics is 4 or more, you may reveal one card for battle destiny (in the same manner you reveal a card for any other destiny). Cards and abilities can affect your battle destiny, even if you don’t reveal a card to add to your battle destiny.
You have three units in a site battle. One has tactics 2, and the other two each have tactics 3. Your total tactics is 8. Because that is 4 or more, you reveal a card for battle destiny. The destiny you reveal is 5.
Attrition Step
You now cause attrition against your opponent equal to your battle destiny. Cards and abilities can affect the attrition you cause, even if you haven’t revealed a card to add to your battle destiny.
If your opponent causes you attrition, you must damage your ships and/or units in that battle. You choose and damage these cards one at a time, until the total defense of those cards equals the attrition your opponent caused. You can’t damage more cards than this, although sometimes the last card you damage will go beyond the total defense required. (You don’t “make change” in such cases.)
Your opponent must damage units in the battle for the 5 attrition your battle destiny caused him. Meanwhile, he has a battle destiny of 4, and is causing you 4 attrition. You damage one of your units that has defense 3. You then damage another that has defense 2. You’ve gone 1 beyond the 4 total defense you had to damage. Your third unit remains undamaged.
If your opponent causes you attrition, and every one of your undamaged ships and undamaged units in the battle is “immune to attrition,” you may ignore the rest of that attrition and choose to damage no more cards. You may damage a unit that is immune to attrition if you want to.
Any of your cards that have been damaged before this step still apply their total defense against your opponent’s attrition.
First the attacker satisfies attrition with the following procedure, then the defender does so. The actions taken during this procedure do not go on the stack.
Power Step
Each player determines his or her own total power in the battle. In a site battle, add the power of all your units in the battle. In a sector battle, add the power of all your ships in the battle (but not any units aboard them). In both kinds of battle, you also add your battle destiny as determined in the earlier step. Other cards and abilities can affect your total power.
When this step begins, each player’s total power can’t be modified by interrupts/activated abilities, although triggered abilities may still affect it.
The side with the most power is the winner and the other side is the loser. If the total power of both sides is equal, there is no winner and no loser.
You add up the total power of your three units in the battle, including the two damaged ones. One has power 3, another has power 2, and the third has power 5. You also add your battle destiny of 5, giving you a total power of 15 in the battle. Your opponent’s total power is 8. You win the battle.
The difference between the winner’s total power and the loser’s total power is the casualties suffered by the loser.
Loss Step
If you lose the battle, you must lose energy equal to your casualties. Any of your units and/or ships in the battle that are damaged reduce your casualties by their defense.
You may further reduce your casualties by choosing to damage additional units and/or ships you have in the battle. You can’t damage more cards once you’ve reduced your casualties to 0, although sometimes the last card you damage will go beyond the total amount of your casualties. (You don’t “make change” in such cases.)
Your opponent has 7 casualties, because you beat him 15 to 8. He already has a damaged unit from the attrition step that has defense 5, which reduces his casualties to 2. He could choose to damage another unit to continue reducing the loss, but decides to lose energy instead. He does this in any combination from his reserve, active pile, and used pile. He can also lose cards from his hand. He decides to lose a card from his hand, and the top card of his reserve.
When this step begins, casualties can’t be modified by interrupts/activated abilities, although triggered abilities may still affect them.
End of Battle Step
When this step begins, each damaged card must be destroyed. First, the attacker destroys all of his or her damaged cards, in any order he chooses. Then, the defender does the same. When all damaged cards are destroyed, the battle ends. Note that a damaged card which is not at the location of the battle must still be destroyed.
As this battle ends, two of your units are damaged, from earlier during the attrition step. They are now both destroyed, and so is your opponent’s damaged unit.
5. Move Phase
In this phase, you may perform movement actions to move your ships and units. There's no limit to the number of ships and units you may move. Each movement action costs you 1 energy. You may perform more than one movement action with the same ship or unit during the same move phase.
There are five different ways a card can be moved with a movement action. You must state which one you’re doing, which ship or unit you’re moving, and where you’re moving it to at the time you pay the cost of the movement action. The five ways are:
Move target ship you have at a sector to another target sector.
Move target unit you have at a site to target adjacent related site.
Move target unit you have at a site, putting that unit aboard target ship you have at a related sector, if capacity allows.
Move target unit you have aboard a ship at a sector, putting that unit at target related site.
Move target unit you have aboard a ship at a sector, putting that unit aboard a different target ship you have at the same sector, if capacity allows.
When a card uses the word “movement,” it is referring to one of these five forms of the movement action. Other abilities allow you to “move” cards for other costs. You don’t pay an additional 1 energy when using such an ability.
Your ship has the ability “Pay 3 energy ≈ Move target vehicle from aboard this ship to a related site.” You are not using a movement action, so your cost is 3 energy, not 4.
When you move a card, any weapons or assets beneath it move with it. When you move a ship, any units, weapons or assets aboard it move with it.
6. Draw Phase
In this phase, you may draw cards from the top of your active pile. There’s no limit to the number of cards you may draw. Each card drawn is a single draw action. You may see the card you get when you perform one draw action before deciding to draw another.
End of Turn
When you complete all six phases of your turn, all effects that last until “end of turn” expire. Both players recirculate their own used piles to the bottom of their reserves. Any energy remaining in a player’s active pile remains there.
Your opponent then begins his or her turn.
Winning the Game
You win the game if at any point your opponent has no energy remaining. The cards in a player’s reserve, used pile, and active pile make up that player’s energy (cards in hand do not).
Important Concepts
Factions
In the future setting of WARS TCG, five factions battle for supremacy in our Solar System, sometimes making uneasy alliances with one another to fight mutual threats. These five factions are: Earther, Gongen, Maverick, Shi, and Quay. In addition, Independent forces are employed by each to augment their strength.
Each card in WARS TCG either belongs to one of the five factions, or it is independent. Color, background texture, and the support icon cost along the left edge of a card indicate which faction. Once in play, cards from different factions (and independent cards) may mix freely during the game.
Types of Cards
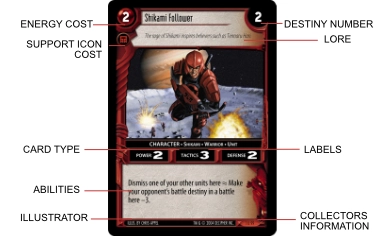
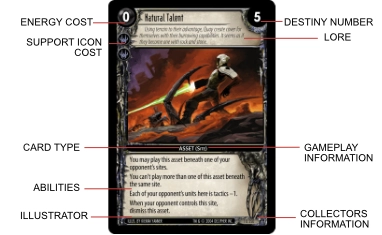
There are nine card types in the game: character, NōBot, vehicle, ship, weapon, asset, order, interrupt, and location. The layouts of some of these card types appear similar, but the card type always appears on the card type line in the middle of the card, in CAPS, and can be used to tell them apart.
On that card type line, following the card type in CAPS, are other words called labels that can be used to identify a card. Also found on that same line is gameplay information in parentheses.
SHIP (CAPACITY 1) • FIGHTER means this card’s type is SHIP, with (CAPACITY 1) – a game term – and it has the label of FIGHTER.
Character, NōBot, Vehicle, Ship
A character or NōBot is a type of card that represents one or more beings (including bots and aliens) which you send into battle against your opponent’s forces at ground locations.
A vehicle is a war machine, and its crew, that also battles at ground locations.
Each character, vehicle, and NōBot has the label of UNIT.
A ship is a large capital or smaller fighter which battles your opponent's forces in space.
Weapon, Asset, Order, Interrupt
A weapon enhances the capabilities of one of your other cards.
An asset is an ongoing strategic advantage you can use throughout the game. Some assets are played beneath other cards.
An order can be played for a one-time effect during your deploy phase.
An interrupt also produces a one-time effect, but can be played during any phase of either player's turn.
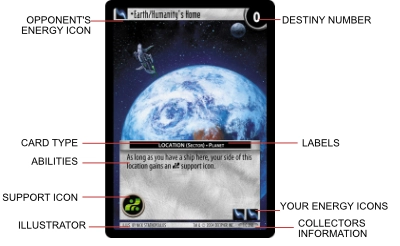
Location
A location is a place in the Solar System which you and your opponent battle to control. A sector represents a location in space, while a site represents a ground location on a planet, moon, station, or asteroid.
Locations provide energy icons to help you and your opponent play your cards. Some face your side, and some face your opponent’s side.
Most locations provide a support icon for one of the five factions: Earther , Gongen, Maverick , Shi, and Quay.
Some locations are encampments, and they may be played beneath another target location.
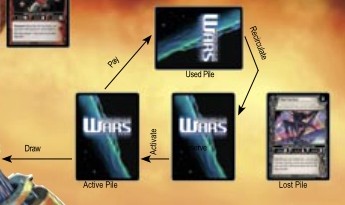
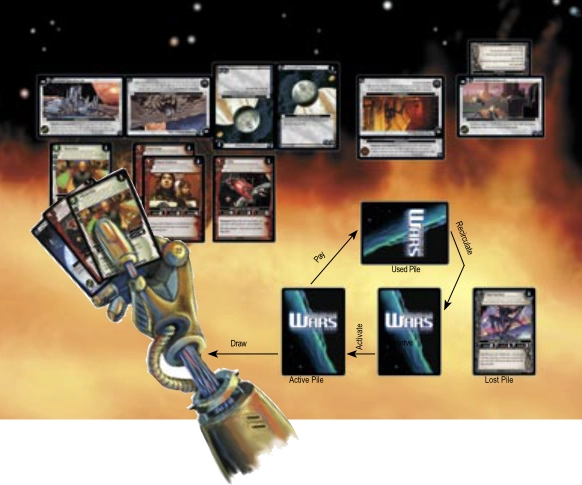
Energy
Energy is your most important resource. Each card in your deck is 1 energy. During the game, your energy flows through three piles (reserve, active pile, and used pile) as you use it to carry out your strategy.
At the start of the game, all your energy is in a pile called your reserve. You must activate that energy before it can be used to play your cards. When you activate an amount of energy, you take that number of cards one at a time from the top of your reserve and put them on top of your active pile without looking at them.
Energy in your active pile can be used to pay energy costs on your cards. When you pay an amount of energy, you take that number of cards one at a time from the top of your active pile and put them on top of your used pile without looking at them.
Energy in your used pile recirculates at the end of each player’s turn (both your turns and your opponent’s turns) for you to eventually activate and pay energy costs again. When you recirculate energy, take your entire used pile and put it on the bottom of your reserve without looking at or changing the order of the cards.
During a game, you will often have to lose energy. When you lose an amount of energy, you take that number of cards one at a time from the top of any of these three piles, in any combination, and put them face up in your lost pile. You can also choose to lose a card from your hand in place of losing 1 energy, even though cards in your hand are not part of your energy.
You’re required to lose 4 energy. You can choose to first lose a card from your hand, then a card from the top of your used pile, and finally two cards from the top of your reserve. You make these decisions as you go, because you put all these cards in your lost pile one at a time.
There are reminders of how all this works later on. For now, just remember that energy flows through three piles (reserve, active pile, and used pile), and that any of your cards that isn’t in one of them is no longer energy. If you have no energy remaining, you lose the game.
Destiny
Destiny is a number that appears in the upper right corner of every card. These numbers are sometimes used to determine the outcome of an effect.
When you’re asked to reveal a card for destiny, reveal the top card of your reserve and note its destiny number. Then put the card on top of your used pile. Most cards tell you to do this by using thesymbol. Any time you use a card that includes this symbol, reveal a card for destiny and replace the (D) with the number you reveal.
You play a card that says “Draw (D) cards from your reserve.” When you play it, you reveal the top card of your reserve and note it has destiny 3. You put the card you revealed on top of your used pile, then draw three cards from your reserve.
Some cards use the phrase “opponent’s (D),” meaning your opponent reveals the top card of his or her reserve (putting it in his or her used pile afterward), and you should note that card’s destiny.
Destroy and Dismiss
A card in play can be destroyed or dismissed, which puts it into its owner’s lost pile. If you’re told to dismiss a card, you must choose one of your own cards. If you’re told to destroy a card, you must choose one of your cards or one of your opponent’s.
Target
When one of your cards uses the word “target,” you choose something for that card to affect unless the card says “your opponent chooses target _____.”
You play a card which says, “Destroy target asset.” You choose which asset in play is to be destroyed.
Here
When a card uses the word “here,” that means the location that card is at. If a location card uses the word “here,” it’s referring to itself.
Abilities
Abilities explain what a card does in the game. Some cards have more than one ability, each separated by a line break.
There are three different kinds of abilities you can find on a card: an activated ability, a triggered ability, and an ongoing ability.
An activated ability is any ability that contains a rift (≈) symbol. You choose when to use activated abilities on your cards in play, during your turn or your opponent’s. The part before the ≈ is the cost you must pay to do this. The part after the ≈ is the effect you perform each time you pay the cost.
Some activated abilities also have one or more bullet (•) symbols.
Your unit has the ability “• Pay 2 energy ≈ Draw a card from your reserve.” The ≈ symbol tells you this is an activated ability. Paying 2 energy is the cost to use it. Each time you do, you draw a card from your reserve. That’s the effect. The • symbol tells you that you may use this ability only once during a single turn.
A triggered ability is any abilitybeginning with the words “when,” “each time,” or “at.” The text then describes a specific event that can occur in the game.
Your unit has the ability “Each time one of your units here is damaged, activate up to 2 energy.” The “each time” at the beginning tells you this is a triggered ability. It is triggered each time one of your units at the same location is damaged.
An ongoing ability is any ability on a card which is not an activated ability or a triggered ability. Its effect is constant, lasting as long as the card remains in play.
Your unit has the ability “Each unit you play at a related site costs 1 less energy to play.” This is an ongoing ability.
Some ongoing abilities begin with the words “as long as.” They have a stated condition which means their effect is “on” while that is true and “off” when it is not.
Your character has the ability “As long as this character is at a site where you have a vehicle, this character is power +2.” This ability starts working when a vehicle is there, and stops when there are none.
Cards Override Rules
Any time a card contradicts a specific rule, the card takes precedence.
If a card says “You can’t draw any more cards until end of turn,” you can’t draw cards, even though the rules allow you to do so during the draw phase.
Building a Deck
The strategy of WARS TCG grows even deeper when you construct your own deck using cards from your collection.
Each deck must be exactly 60 cards.
You must include at least one location (to start the game with).
You may include no more than four copies of a single card. (Some cards are unlimited, and you may include any number of copies of those cards in your deck.)
The Stack and Initiative
Each time a player plays a card or uses an ability, it is placed on “the stack” while players decide if they wish to respond by playing an interrupt or using an activated ability. This point of decision comes after any costs are paid for the card or ability, but before its effects are performed. (In the case of a location, unit, ship, weapon, or asset, the “effects” are often simply that the card enters play.)
The stack is more of a helpful concept than an actual physical stack of cards. While it may be helpful to make a stack of cards like interrupts, using activated abilities on characters or weapons doesn’t mean you should place those cards on a physical stack.
The actions you are allowed to perform during certain phases of your turn are also placed on the stack: activation (activate phase), drain action (control phase), attack action (battle phase), movement (move phase), and draw action (draw phase). These are called phase actions. Phase actions can only be placed on the stack when the stack is empty.
In most cases, neither player will want to respond to a card, ability, or action.
During your move phase, you use the movement action, announcing that you are moving one of your units to an adjacent site. After you pay the 1 energy for this action, but before you perform its effects, both you and your opponent could respond with an interrupt or activated ability. Neither of you do, so you perform the effect of moving your unit.
When something is placed on the stack, and a player does respond with an interrupt or activated ability, it in turn is also placed on the stack. This creates an opportunity for further responses. Things pile up in order on the stack until both players pass consecutively on the chance to respond. At that point, the card or ability most recently added to the stack is taken off, and its effects are performed.
You pay 1 energy to move another unit, and this time your opponent responds with an interrupt. After he pays its costs and places it on the stack, you respond with an activated ability and place it on the stack. You both pass on the opportunity to respond further, so you take your activated ability off the stack and perform its effects.
Each time a card or ability is taken off of the stack, players have another opportunity to respond with an interrupt or activated ability. Each time both players pass on an opportunity to respond, the card, ability, or phase action most recently added to the stack is taken off, and its effects are performed.
After you perform the effects of your activated ability, you both pass on the opportunity to respond. Then your opponent takes his interrupt off the stack and performs its effects. You both pass again, so now you take your original movement action off the stack and perform its effects, moving your unit as originally announced.
If both players pass consecutively when the stack is empty, proceed to the next phase of the turn or, during a battle, to the next step of that battle.
You have no more movement actions you wish to perform, nor do you wish to play an interrupt or use an activated ability. You pass. Your opponent passes too, so you proceed to your draw phase.
An activated or triggered ability on the stack is not canceled when it’s source is removed from play.
You use a Plasma Cannon to target my unit, putting that ability on the stack. I play Consultation, targeting your vehicle with the Plasma Cannon. Consultation comes off the stack and your vehicle is destroyed, and then your Plasma Cannon ability has its effect, even though that card has left play.
When a card (or ability) comes off the stack, if any of its targets are no longer legal, or any of its other requirements are no longer met, the effect of that card (or ability) is canceled.
 , Gongen
 , Shi
, Shi